Manage Sections
Sections are created for student enrollment and can be customized in a variety of ways. Course Administrators can add, edit, or delete sections that they own or for any other user in the course product. Instructors can add, edit, or delete sections that they own and cannot access another user's sections.
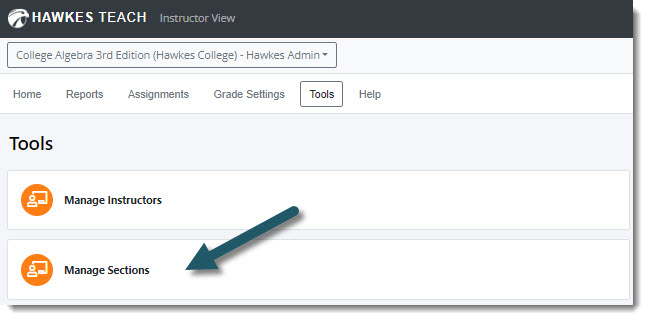
Accessing Manage Sections
1. Log in to your Hawkes Teach Account and open your course from the Instructor Dashboard.
2. In the course, go to the Tools tab and select Manage Sections.
A table listing all existing sections is displayed when you first arrive on this page. Course Administrators will see all course instructors and their sections, while Instructors and other user roles will only see their specific sections.
Create a New Section
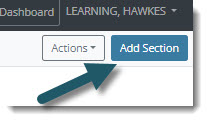
| 1. | Click Add Section in the top-right. |
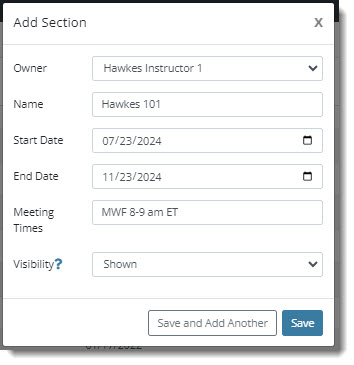
| 2. | The Add Section modal will display. Enter your section details and click Save or Save and Add Another once done. |
Owner: Course Administrators will have this option if they need to create a section for a different instructor.
Name: Enter the name of your section. Students will see this name when enrolling in to your course in Hawkes.
Start Date: Enter the start date for your section. (Must be entered for student temporary access)
End Date: Enter the end date for your section. (Must be entered for student temporary access)
Meeting Times: Enter the meeting times for your section (ex. MWF 8 am - 9 am ET).
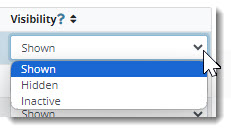
Visibility: Choose how you want your section to display in your instructor course and for student enrollment.
Shown: Available to instructors and students.
Hidden: Not shown to students, but accessible to instructors.
Inactive: Not shown to either instructors or students.
Edit an Existing Section
| 1. | In your section list, hover the mouse over the text you want to update. The row will change color to blue and the cells that can be edited will be a lighter blue. |

2. Click on the field you want to edit (section name, start date, end date, or meeting times).
| ▪ | An existing section end date cannot be more than one year later than the start date. |
3. Edit the field and click out of it to automatically save your changes.
4. To change section visibility, click o the drop-down and select the new option.
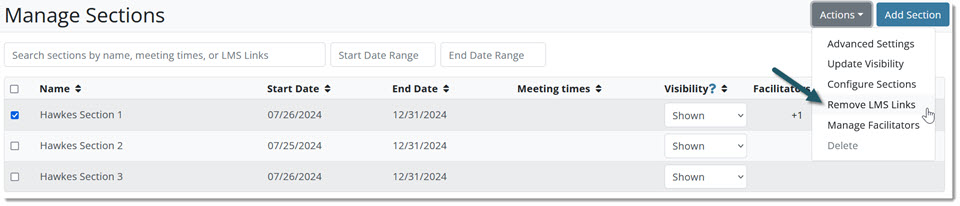
Using the Actions Button
Advanced Settings
1. Click the box next to the section you want to edit.
2. Using the Actions button, select Advanced Settings.

3. Update any Advanced Settings as needed.
Note: These settings will default to the Hawkes Best Practices. We do not encourage instructors to update these settings unless their own custom setup deems it necessary.
Do not accept work complete before the start date: Choose whether or not to allow previously completed Lesson and WebTest grades to transfer in to your section for students that may be repeating the course or need to carry previous grades with them.
Do not accept work completed after the section end date: Choose whether or not to allow Lesson and WebTests grades to calculate in to a student's grade if completed after the section end date.
Zero-out scores after the section end date: Choose whether or not to allow all uncompleted assignments to calculate as a "zero" after the section end date.
Hide section details from students: Choose whether or not to display the section start date, end date, and meeting times to students.
Lessons Due: Choose the time you want all assigned Lessons due by.
Time Zone: Change the time zone your section is associated to.

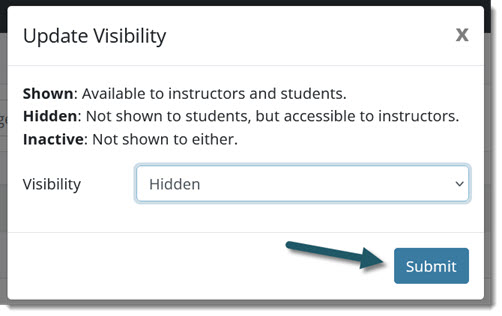
Update Visibility
1. Click the box next to the section you want to edit.
2. Using the Actions button, select Update Visibility.

3. A modal will appear to update the visibility for the selected section(s). Choose the visibility and click Submit.
Configure Sections
1. Click the box next to the section you want to edit.
2. Using the Actions button, select Configure Sections.

3. A modal will appear giving you different options to apply to the section(s) you selected.
Apply From: Select the master section you would like to get settings, assignments, and policies from.
Apply To: All section(s) that were initially selected will show as checked in the drop-down. Additional sections can be added by checking the box next to the section name in the drop-down. Sections can be removed by un-checking the box next to the section name in the drop-down.
Basic: Check the box next to section start and end date and/or section meeting times to override the "apply to" section(s) existing settings and copy over the "apply from" section's settings.
Advanced: Check the box next to any of the four options to override the "apply to" section(s) existing settings and copy over the "apply from" section's settings.
Content: The "apply to" section(s) will inherit the "apply from" section's Lesson Due Dates, Assigned Quizzes and Tests, Other Assignments, Course Materials, and Curriculum. These settings can still be edited by the section owner. The "apply to" section(s) will also get their own editable copy of the Student To-Do List, and any edits by the section owner will not affect any other sections owned by different instructors.
Policies: The "apply to" section(s) will inherit the "apply from" section's Grading Options, Assignment Groups, Attendance Policy, Assignment Reminders, and Lesson Late Penalties. These settings can still be edited by the section owner. The "apply to" section(s) will also get their own editable copy of Letter Grades, and any edits by the section owner will not affect any other sections owned by different instructors.
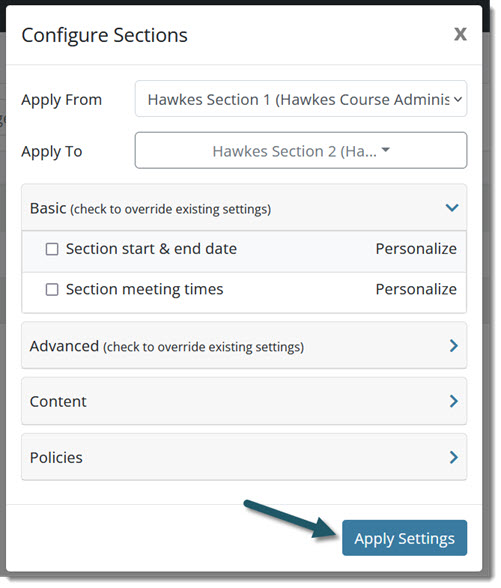
4. Once finished, click Apply Settings.
Remove LMS Links
1. Click the box next to the section you want to edit.
2. Using the Actions button, select Remove LMS Links.
3. A modal will appear confirming the section(s) to un-link. Click Confirm to remove the LMS links.

Manage Facilitators
1. Click the box next to the section you want to edit.
2. Using the Actions button, select Manage Facilitators.

3. Select the facilitator(s) you would like to share your course with. Facilitators will have access the section the same way the section owner would, being able to view student data and grades, to assign or update Lessons or WebTests, and to edit the course settings.
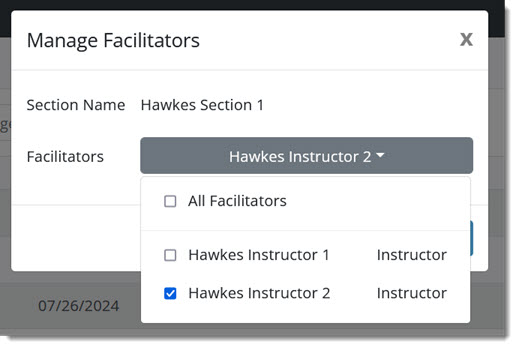
4. Once finished selecting the facilitators, click Submit.
5. To remove facilitators, repeat the steps above and un-check the box next to any current facilitators to remove their access to your section.
Delete (This option is currently disabled for maintenance)
1. Click the box next to the section you want to edit.
2. Using the Actions button, select Delete.

3. A confirmation modal will appear listing the names of the section(s) that will be deleted. Click Continue.
A CSV export of the student grades associated with the deleted section(s) will automatically download to your browser.

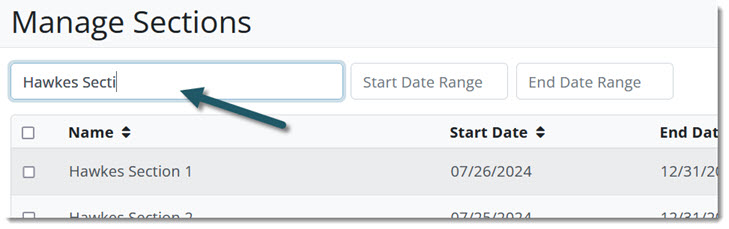
Searching for a Section
Search for a specific section by clicking in to the search box and typing in a section name or meeting times. Three or more characters are required for the search.